So looking for play with animation stuff.. good!! you are on right place :)
today we are going to learn how to create simple android animation app.
so in this application we will create Background View and Ball programatically which will jump.
let's began the code, first of all we need to create simple android app having single Activity
name is :
BouncingBallActivity.java
Now we need to create a View programatically [we will not using any xml file]
here we go..
BouncingBallView.java
AndroidManifest.xml
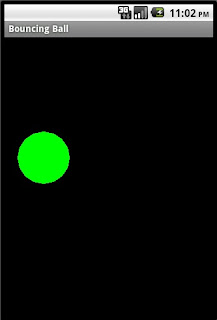
output is like this
we have done great job on ma B'day!! :D
cheers!!
I'd love to here your thoughts!
today we are going to learn how to create simple android animation app.
so in this application we will create Background View and Ball programatically which will jump.
let's began the code, first of all we need to create simple android app having single Activity
name is :
BouncingBallActivity.java
package com.mytest;

import android.app.Activity;
import android.os.Bundle;
import android.view.View;

public class BouncingBallActivity extends Activity {
    /** Called when the activity is first created. */
    @Override
    public void onCreate(Bundle savedInstanceState) {
        super.onCreate(savedInstanceState);
        //setContentView(R.layout.main);

        View bouncingBallView = new BouncingBallView(this);
        setContentView(bouncingBallView);
    }
}
Now we need to create a View programatically [we will not using any xml file]
here we go..
BouncingBallView.java
package com.mytest;

import android.content.Context;
import android.graphics.Canvas;
import android.graphics.Color;
import android.graphics.Paint;
import android.graphics.RectF;
import android.view.KeyEvent;
import android.view.View;

public class BouncingBallView extends View {
   private int xMin = 0;          // This view's bounds
   private int xMax;
   private int yMin = 0;
   private int yMax;
   private float ballRadius = 40; // Ball's radius
   private float ballX = ballRadius + 20;  // Ball's center (x,y)
   private float ballY = ballRadius + 40;
   private float ballSpeedX = 5;  // Ball's speed (x,y)
   private float ballSpeedY = 3;
   private RectF ballBounds;      // Needed for Canvas.drawOval
   private Paint paint;           // The paint (e.g. style, color) used for drawing

   // Constructor
   public BouncingBallView(Context context) {
      super(context);
      ballBounds = new RectF();
      paint = new Paint();

      //to enable keypad
      this.setFocusable(true);
      this.requestFocus();
   }

   // Called back to draw the view. Also called by invalidate().
   @Override
   protected void onDraw(Canvas canvas) {
      // Draw the ball
      ballBounds.set(ballX-ballRadius, ballY-ballRadius, ballX+ballRadius, ballY+ballRadius);
      paint.setColor(Color.GREEN);
      canvas.drawOval(ballBounds, paint);

      // Update the position of the ball, including collision detection and reaction.
      update();

      // Delay
      try {
         Thread.sleep(60);
      } catch (InterruptedException e) { }

      invalidate();  // Force a re-draw
   }

   // Detect collision and update the position of the ball.
   private void update() {
      // Get new (x,y) position
     // ballX += ballSpeedX;
      ballY += ballSpeedY;
      // Detect collision and react
      if (ballX + ballRadius > xMax) {
         ballSpeedX = -ballSpeedX;
         ballX = xMax-ballRadius;
      } else if (ballX - ballRadius < xMin) {
         ballSpeedX = -ballSpeedX;
         ballX = xMin+ballRadius;
      }
      if (ballY + ballRadius > yMax) {
         ballSpeedY = -ballSpeedY;
         ballY = yMax - ballRadius;
      } else if (ballY - ballRadius < yMin) {
         ballSpeedY = -ballSpeedY;
         ballY = yMin + ballRadius;
      }
   }

   // Called back when the view is first created or its size changes.
   @Override
   public void onSizeChanged(int w, int h, int oldW, int oldH) {
      // Set the movement bounds for the ball
      xMax = w-1;
      yMax = h-1;
   }

   // key-up event handler
   @Override
   public boolean onKeyUp(int keyCode, KeyEvent event) {
      switch (keyCode) {
         case KeyEvent.KEYCODE_DPAD_RIGHT: // Increase rightward speed
            ballSpeedX++;
            break;
         case KeyEvent.KEYCODE_DPAD_LEFT:  // Increase leftward speed
            ballSpeedX--;
            break;
         case KeyEvent.KEYCODE_DPAD_UP:    // Increase upward speed
            ballSpeedY--;
            break;
         case KeyEvent.KEYCODE_DPAD_DOWN:  // Increase downward speed
            ballSpeedY++;
            break;
         case KeyEvent.KEYCODE_DPAD_CENTER: // Stop
            ballSpeedX = 0;
            ballSpeedY = 0;
            break;
         case KeyEvent.KEYCODE_A:    // Zoom in
            // Max radius is about 90% of half of the smaller dimension
            float maxRadius = (xMax > yMax) ? yMax / 2 * 0.9f  : xMax / 2 * 0.9f;
            if (ballRadius < maxRadius) {
               ballRadius *= 1.05;   // Increase radius by 5%
            }
            break;
         case KeyEvent.KEYCODE_Z:    // Zoom out
            if (ballRadius > 20) {   // Minimum radius
               ballRadius *= 0.95;   // Decrease radius by 5%
            }
            break;
      }
      return true;  // Event handled
   }


}
at last our manifest file should look like this..AndroidManifest.xml
output is like this

we have done great job on ma B'day!! :D
cheers!!
I'd love to here your thoughts!